February 15, 2022 / Lily Collins
How To Set Out Of Office In Outlook
If you are looking to send automatic Out-of-Office Replies from your Outlook program, there are basically two ways to configure your email program. The method you use depends on the type of email account you have. Below you can find the step by step instructions for both scenarios
Table of Contents
Guide to Send Automatic Out-of-Office Replies from Outlook
- First, you will need to determine the type of email account you have. For this, you will need to open the Outlook program on your computer and press the File option located on the top-left corner of the screen.
- Now, depending on the screen that appears on your computer, you can proceed with the instructions provided below for the relevant type of email account:
If you are directed to the following screen on your computer, then the instructions you will need to follow in order to set up Out-of-Office in your Outlook program are as follows:
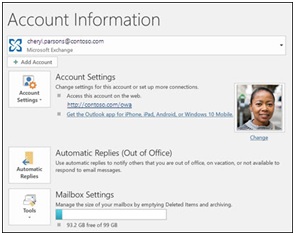
- In your Outlook program, click on the File option and select Automatic Replies (Out of Office) option. This will take you to the next screen.
NOTE: When you are using Outlook 2007, you will need to go to Tools > Out of Office Assistant option.
- In the Out of Office Assistant option, you will need to go to the Automatic Replies box and select Send Automatic replies option.
NOTE: There is also an optional feature that you can use to set a date range for your automatic replies. This option will configure your Outlook to disable automatic replies according to the date and time you set up. In case you do not want to set up the date and time, you will need to disable the automatic replies manually when required.
- Next, you will need to enter the response which you wish to send to colleagues or clients while you are on vacation on the “Inside My Organization” tab.
NOTE: If you are looking to send automatic replies to anyone outside my organization, it will send the automatic reply to every email, including those you receive from newsletters, advertisements, and junk email. When sending automatic replies to people outside your organization, it is suggested to make sure to select “My contacts only”.
- Once you have entered the desired message, click on the OK button.n
Disabling Automatic Out-of-Office Replies
When you have your Outlook configured to send automatic replies, you will see a message under the ribbon with this information. Here, you will need to select “Turn off” option to deactivate the automatic out-of-office replies. In case you wish to modify the dates for your automatic reply or the message sent, perform the step provided above to make the changes.
NOTE: If you are using Outlook 2007, you can turn off out-of-office replies, select Tools > Out of Office Assistant and deselect the checkbox next to the “Send out of Office auto-replies” option.
And this is how you can set up your Outlook for Out-of-Office replies. On the other hand, if you see the following screen on your computer, you will need to follow the steps provided below the image.
 If you don’t see the Automatic Replies button, it means that your email account is not compatible with this feature. In such a case, you will need to create a rule to reply to the emails automatically. Creating a rule in your email account will allow you to easily:
- Forward emails to another account
- Mark emails as read
- Automatically move them to a folder
- In your Outlook email program, click File option. You will see a screen as shown above. As there is no option available for configuring an out-of-office reply, you will need to set up an out-of-office template by following the steps below:
- Start by creating a new email in your Outlook. Enter a subject and a message body in the relevant fields for your Out-of-Office template.
- Next, click on the File option, select Save As option and enter a suitable name for the template. Then, you will need to select Outlook Template (*.oft) option in the Save as type drop-down.
- If you want you can change the location for your template using the given option, or you can use the default location which is usually – c:usersusernameappdataroamingmicrosofttemplates. Then, click on the Save button.
- After creating a new template, you will need to create an out-of-office rule in your Outlook account.
Creating an Out-of-Office Rule
- Click on the File option in your Outlook program and select Manage Rules & Alerts option.
- Next, in the Rules and Alerts dialog box, you will need to go to the E-mail Rules tab and click on the New Rule option.
- Then, click on the Apply rule on message I receive option under Start from a blank rule section and press the Next button.
- If you want to reply to each and every email message you receive, keep the boxes unchanged in Step 1 and Step 2 and click on the Next button again.
- Then, select Yes option when Outlook prompts whether to apply this rule to all messages or not.
- Next, you will need to select a reply using a specific template option in Step 1: Select action(s) in the “What do you want to do with the message”.
- Similarly, in Step 2: Edit the rule description, click on the underlined text for a specific template option.
- Then, select User Templates in File System in the Look In box located at the top of the Select a Reply Template box.
- After that, select the template you created and then select Open and press the Next button.
- In the provided field, you will need to enter a suitable name for the rule, for example, “On-Vacation” “Out-of-Office”.
NOTE: You will find the “Turn on this rule’ option selected by default. If you wish to activate the rule right away, you will first need to click on the Finish button. However, if you wish to enable the rule later, deselect the “Turn on this rule” option and select Finish.
To Enable the Rule
If you are looking to enable the rule you created at some other time in your Outlook program, you can do so easily by following these steps:
- Open File option in your Outlook program and select Manage Rules & Alerts.
- Next, in the Rules and Alerts dialog box, on the E-mail Rules, find the rule you created and select the checkbox next to the rule.
- After that, simply select the OK button.
So, these are the steps you will need to follow to configure your Outlook for automatic Out-of-Office replies.
Leave a Reply