February 15, 2022 / Lily Collins
Comcast Email Setting for Outlook 2016
Do you prefer using an email program (Outlook 2016) for your Comcast email? We have got you covered. Read on to know the Comcast email setting for Outlook 2016!
Note: The following instructions can also be applied to Outlook 2013.
How to Configure Comcast Email Setting for Outlook 2016?
Carry out the following steps as they are to get the desired results.
- Open Outlook 2016 and go to ‘File’.
- The File menu will lead you to the ‘Account Settings’ button. Click on it and choose ‘Account Settings’.
- Look for the ‘New’ option and click the button that says ‘E-mail Account’.
- Click ‘Next’
- You will get the option ‘Manual setup or additional server types’. Select it and then click on the ‘Next’ button.
- The next step prompts you to select ‘IMAP’ or ‘POP’.
- Once selected, click on the ‘Next’ button.
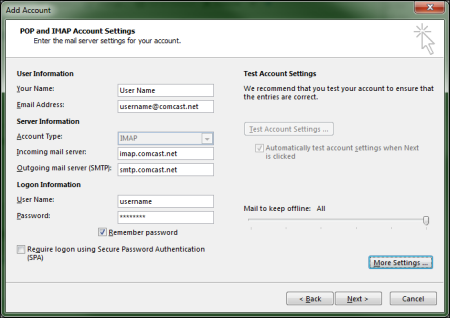
- Here, you will be prompted to enter your name and email address.
- Follow the on-screen instructions to fill these fields and select IMAP in the ‘Account Type’ field.
- In the ‘Incoming Mail Server’ field, enter ‘imap.comcast.net’
- In the ‘Outgoing Mail Server’ field, enter ‘smtp.comcast.net’
- In the next step, you will need to confirm your Comcast ID/ Xfinity ID has been entered into the ‘Username’ field.
- After confirming, you will need to enter the password of your Comcast email. Enter ‘Password’ in its right field and click ‘More Settings’. This option is located above the ‘Back’, ‘Next’, and ‘Cancel’ options.
- You will next be prompted to click the ‘Outgoing Server’ tab.
- ‘My outgoing server (SMTP) requires authentication’ – click on the check-box and then confirm ‘Use same settings as my incoming mail server’.
- Next, click on the ‘Advanced’ button.
- In the ‘Incoming Server (IMAP)’ field, you need to enter ‘993’
- From the drop-down box for ‘Use the following type of encrypted connection’, you need to select ‘SSL’.
- In the ‘Outgoing Server (SMTP)’ field, you need to enter ‘587’
- From the drop-down box for ‘Use the following type of encrypted connection’, you need to select ‘TLS’.
- Select ‘OK’
- Click on the ‘Next’ option. (Outlook will then perform a test)
- Once the test of the account settings is over, you can select ‘Close’
- Now, click ‘Finish’ and then click on the ‘Close’ option.
That’s it! You have completed Comcast email settings for Outlook 2016. You are now ready to use Outlook client to receive or send Comcast email.
The above steps are also applicable to Outlook 2013. If you use Outlook 2013, go ahead with these steps.
At any point, if you need technical assistance, you can always get in touch with the professionals. The certified technicians would ensure the error is resolved within no time.
Leave a Reply