February 15, 2022 / Lily Collins
How to Forward iCloud Email to Gmail?
iCloud emailing is the easiest and efficient email service used in both offices and at home. With every Apple ID that a customer uses, he/she gets a free iCloud email address and an iCloud account. That is why when you buy a new Apple product, you get a well-equipped product that makes carrying out your email related tasks easier than ever.
Every iCloud account has 5gb free storage space available on it. Once can access this account easily through different Apple product they have. In case a user doesn’t have an Apple iPhone and iPad or other mobile devices, in such a case, he or she can make use of computers and access their account through a web interface.
When you have multiple email accounts from other services or even another iCloud Mail account to manage, checking these accounts can be an annoying and time-consuming task. In such a case, one of the best ways to manage your iCloud Mail account is by forwarding its emails to another email account like Gmail. To know how you can forward emails from your iCloud Mail to Gmail account, go through the information provided below.
Table of Contents
Guide to Forward iCloud Email to Gmail Account
There are basically two ways you can forward emails from your iCloud Mail account. While the first method includes making changes in the iCloud Mail settings, the second method includes making changes in the Gmail account. Below you can find the detailed instructions for both methods.
Methods 1: Making Changes in iCloud.Com
- On your computer, open a web browser, and go to the iCloud.com page. You will be directed to the iCloud.com login page.
- Once you are on the iCloud.com page, you will need to enter your Apple ID and Password in the provided fields and log into your account.
- Once you are logged into your iCloud account, you will need to select the Mail icon to open iCloud Mail.
- In your iCloud Mail account, you will need to click on the Gear icon located at the bottom of the left-hand side panel, under the mailboxes list.
- From the drop-down menu that appears on your screen, you will need to select the Preferences option.
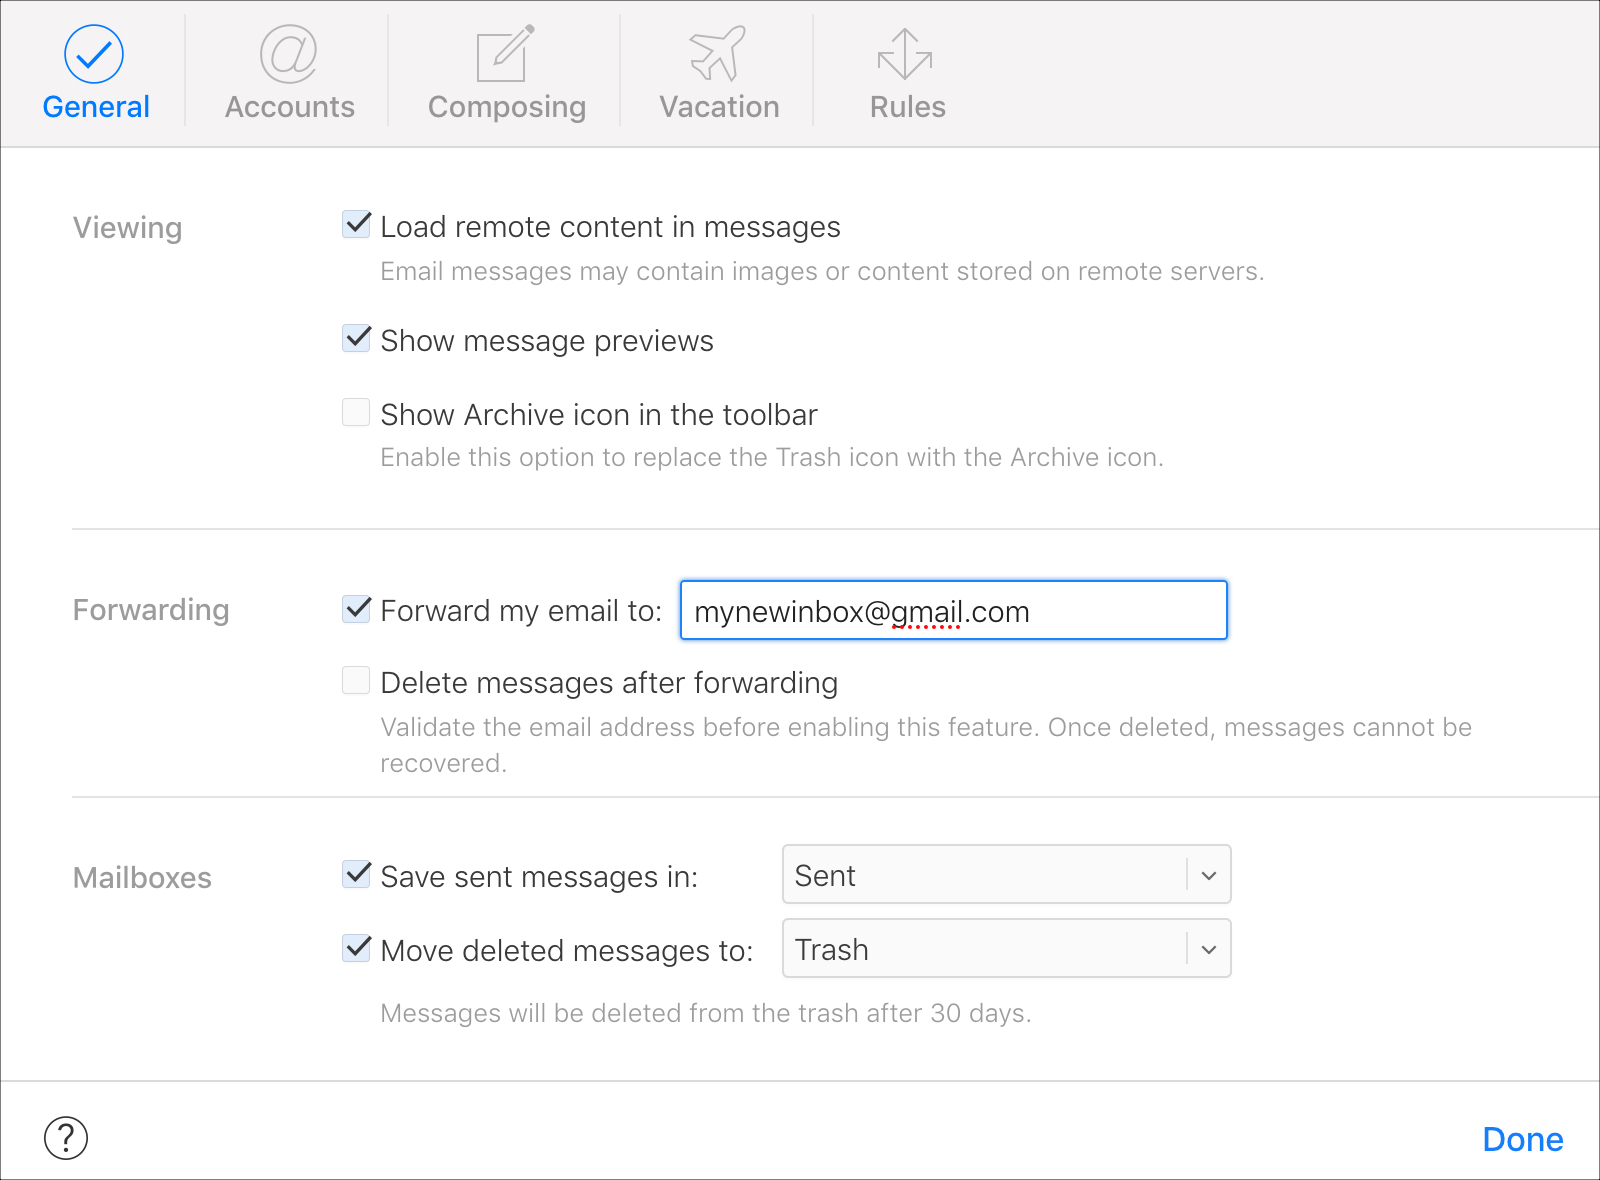
- Once you are in the Preferences section, you will need to select the General tab.
- In the General tab, you will need to select the checkbox next to Forward my email to option.
- In the Forward my email to section, you will be prompted to enter the email address to which you wish to forward all your incoming emails automatically. So, enter the email address of your Gmail account in the provided field.
- Additionally, if you want your forwarded email to be removed from the iCloud Mail account once they have been forwarded, you will need to select the checkbox next to the Delete messages after the forwarding option. However, you will first need to make sure that the email account you are forwarding it to is receiving the messages from your iCloud Mail account properly. This will help in avoiding losing your important emails.
NOTE: Make sure to enter the correct email address in the provided field as entering an incorrect email address will forward your email to the wrong address and delete them at the same time from the iCloud account, which means that you would lose access to all your emails.
- Once you are done making configurations and have reviewed everything, you can press the Done button to complete the auto-forwarding of emails from your iCloud Mail account to the Gmail account.
So, this is one of the methods to forward your iCloud emails to a Gmail account. Now, to know about the second method, follow the information provided below.
Method 2: Configuring Settings in Gmail Account
In this method, you will need to make changes to the settings of your Gmail account to easily forward emails from your iCloud Mail account to your Gmail account. Below are the steps that will help you complete the process.
- In the first step, you will first need to open a web browser on your computer and go to the Gmail sign-in page.
- Once you are on the Gmail –sign-in page, you will need to enter your username and password of your Gmail account in the provided fields and log into your account.
- Once you are logged into your Gmail account, you will need to click on the Gear icon located on the top-right corner of the screen. A drop-down menu will appear on your screen.
- From the drop-down menu, you will need to select the Settings option. You will be directed to the Settings section of your Gmail account.
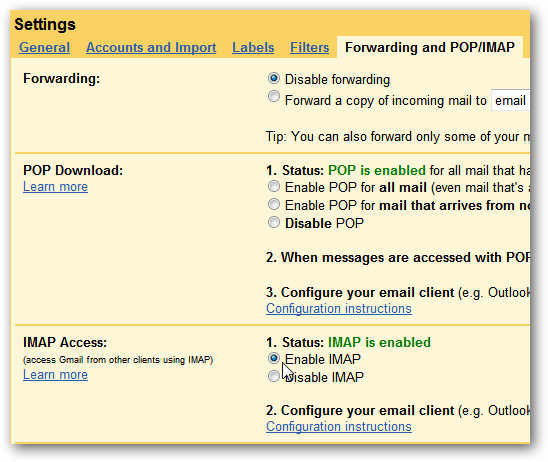
- In the Settings section of your Gmail account, you will need to go to the Accounts and Import tab. You will find this tab in the menu bar located below Settings.
- Once you are in the Accounts and Import tab, you will need to locate the Check mail from other accounts option.
- In the Check mail from other accounts option, you will need to click on the Add a mail account option. As you will click on this option, it will open an “Add a mail account” window on your screen.
- In the “Add a mail account” window, you will need to enter the email address of your iCloud Mail account in the provided field and click on the Next button.
- As you will click on the Next button after entering the email address of your iCloud Mail account, you will be shown following two options in the same window:
- Link accounts with Gmailify
- Import emails from my other account (POP3)
NOTE: While you can select any of the two options to auto-forward emails from your other email accounts to Gmail, however, for iCloud Mail, you will see that the “Link account with Gmailify” option is grayed out and it says – Gmailify is not available for this provider.
- As you will find the “Link account with Gmailify” option is grayed out, you will need to select the “Import emails from other account (POP3)” option.
- After selecting the option, you will need to click on the Next button. Doing so will direct you to the next screen in the same window.
- On the next screen, you will be prompted to enter information for the following fields:
- Username: Enter the username of your iCloud Mail account)
- Password: Enter the password of your iCloud Mail account
- POP Server: (it will be pre-populated)
- Port: (It will be pre-populated)
- Leave a copy of retrieved message on the server: Selecting the checkbox next to this option will keep a copy of the retrieved emails on the server.
- Always use a secure connection (SSL) when retrieving mail: Selecting the checkbox next to this option will make Gmail use a secure connection (SSL) when retrieving mail.
- Label incoming messages (it will be pre-populated with your iCloud Mail account): Selecting the checkbox next to this option will allow you to label incoming emails from your iCloud Mail account. Although this option is pre-populated with your iCloud Mail account, you can change or create a new label using the drop-down menu.
- Archive incoming messages (Skip the Inbox): Selecting the checkbox next to this option will allow you to archive your emails and prevent them from getting into the Inbox folder of your Gmail account.
- Once you have entered the appropriate information for the required fields and done with the rest of the settings, you will need to click on the Add Account button.
- As you will click on the “Add Account” option, you will need to wait for a few seconds to get to the next step.
- On the next screen, under the option that reads – “Would you also like to be able to send mail as [email protected]”. Here, you will need to select the “Yes, I want to be able to send mail as [email protected]” option. Then, you will need to select the Next button.
NOTE: You may or may not be provided with this prompt. If you are not prompted with this step, you can go to the next step.
- On the next screen, you will be prompted that a verification message has been sent to the email address from which you wish forward emails to your Gmail account. So, you will need to go to a new tab on your web browser and sign in to your iCloud Mail account to see the message.
- Once you are logged into your iCloud Gmail account, you will need to open the email that you would have received from Gmail. After opening the email you will need to click on the verification link and follow the on-screen prompts.
- You may also be prompted to allow permission to Gmail to access your iCloud Mail account. If prompted, you will need to allow permission to Gmail. Once you have followed all the on-screen prompts, your iCloud Mail account will be configured to forward emails to the Gmail account automatically.
Importing Emails to Gmail from iCloud Mail
Another method that can help you forward emails from your iCloud Email account to Gmail is using the Importing option provided in Gmail. This method is suitable for those users who are looking to close their iCloud Mail account and wish to keep their email on a safe and reliable email service like Gmail. To know how to import email from iCloud Mail to your Gmail account, follow these steps:
- Open a web browser on your computer and go to the Gmail sign-in page.
- Once you are on the Gmail sign-in page, enter your username and password of your Gmail account in the provided fields and log into your account.
- Once you are logged into your Gmail account, you will need to click on the Gear icon located on the top-right corner of the screen. A drop-down menu will appear on your screen.
- From the drop-down menu, you will need to select the Settings option. You will be directed to the Settings section of your Gmail account. In the Settings section of your Gmail account, you will need to go to the Accounts and Import tab.
- In the Accounts and Import tab, you will need to go to the “Import mail and contacts” option where you will need to click on the “Import mail and contacts” option (highlighted in blue).
- As you will click on this option, a small window will open on your screen where you will need to enter the email address of your iCloud Mail account.
- After entering the email address in the provided field, you will need to click on the Continue button. Then, on the next screen, you will need to enter the password of your iCloud Mail account and click on the Continue button.
- Now, you will need to follow the on-screen prompts until you reach the step where you are prompted to allow permission to Gmail to import emails from iCloud Mail. Once you are on this page, simply click on the Agree button.
- Then, when prompted with the following options, you will need to select or deselect the checkbox as per your requirement
- Import Contacts
- Import Mail
- Import new mail for the next 30 days
- After selecting the desired options, click on the Start import button. The duration of the importing process will completely depend on the number of emails you are importing. So, you may have to wait from a few hours to a couple of days before you may see emails from your iCloud Mail account in your Gmail account.
Exporting Emails from iCloud Mail
In case you wish to forward certain email messages to your Gmail account and not set auto-forwarding for all the emails you receive in your iCloud Mail account, in such case, you can either forward those emails manually or import them by following the instructions provided below.
- To begin with, you will first need to open Mac Mail on your system and go to the iCloud inbox folder from the Mailbox list.
- Once you are in the iCloud inbox, you will need to go to the Mailbox menu and select Export Mailbox option.
- Next, you will need to select a location for your email in the iCloud Mail account to store the iCloud emails safely at your desired location.
- After that, you will need to hit the Save button. Doing so will create an MBOX archive which will include all your selected email messages from iCloud Mail.
Now as you would have exported your selected email messages from your iCloud Mail in MBOX format, you will need to convert it to a PST File.
- There are numerous third-party applications that you can search on the web to convert your MBOX file format to PST.
- Once you convert them into PST file, you can import them to Gmail. While this method can be helpful for some users, however, the person will need to first configure his or her Gmail account on Outlook in order to import PST files to Gmail account.
So, these are the workarounds that can help you forward your iCloud emails to your Gmail account.
Leave a Reply