February 15, 2022 / Lily Collins
How To Use Outlook Mail Merge Feature
Unlike broadcasting an email message to a group of people, Outlook Mail Merge makes each recipient the sole recipient of the message. The mail merge feature plays a key role in sending a message to many people that you want to be personalized for every individual.
You need 3 files or documents to create email messages using the Outlook Mail Merger process –
- Main Document: Your main document or file is your email message. This basically comprises texts and graphics that are identical for each single version of the merged file.
- Mailing List: What does the mailing list contain? The data. It is the data that is used to inhabit (populate) information on the letter. For example, the list preserves your names, and your main file/ document is the email message that addresses to the names in your mailing list.
- Merged Document: It is the combination of the mailing list and the main document. The Mail Merge process obtains information from the mailing list and enters it in the main document; thus, resulting in a personalized, merged document for every individual on the mailing list.
6 Steps To Use Outlook Mail Merge Process
Step – 1: Prepare Your Main Document
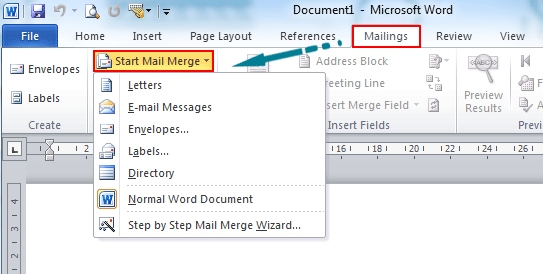
If you wish to let people know about a particular event or program (include name, address, date and time, etc.), write the main content or body of the email message in Word.
- Now, go to the ‘Mailings’ tab, look for the option that says ‘Start Mail Merge’, select ‘Start Mail Merge > E-mail Messages’
Step – 2: Setup Mailing List
Make sure you have Outlook installed in your system to send emails. For people using Outlook MAPI must confirm that the versions of Outlook and Word are the same.
On the other hand, your mailing list is your data source that preserves Outlook contacts, office address list, and an access database. Word would use those records and information to build email messages.
Step – 3: Associate Mailing List with Your Email Message
Choose the mail recipients from your data source (address list). The data source should have a column containing email IDs of people that you want to send the email to (each person must have an email address).
- Mailings > Start Mail Merge > Select Recipients and then select an option
- Now, you must do one of the following –
- Select ‘Type a New List’ and create one if you don’t have a mailing list
- Or, select ‘Use an Existing List’ if the mailing list is in an Access database or an Excel spreadsheet. Browse the list and click ‘Open’
- Or, select ‘Choose from Outlook Contacts’ if you are using Outlook contacts
- Select File > Save as
- Type a file name in the ‘File name’ box and choose ‘Save’
How to Edit Your Mailing List
When you wish to send emails to a particular group of people on your email list, narrow down the list by following the steps under ‘Edit’ section –
- Select ‘Edit Recipient List’
- Sort or filter the list to check the names of the recipients of the email message
Step – 4: Add Personalized Content to Email Message
You can personalize each message (email) by entering people’s name and email address. Simply insert merge fields in the main document and complete the process. Here’s how to do –
- Go to the ‘Mailings’ tab, choose ‘Address Block’ in the ‘Write & Insert Fields’
- In the ‘Insert Address Block’, you need to choose a format for all the recipient’s name (as the name will be displayed in the email)
- Insert the merger field by clicking ‘OK’
- You need to choose ‘Greeting Line’ (in the ‘Writing & Insert’ group)
- Select the format that you wish to use (in the ‘Insert Greeting Line’ dialog box)
- Now, select ‘OK’ to insert the merge field
- Navigate File > Save to preserve your email message
Verifying Merge Field Names
- On Word, go to the ‘Mailings’ tab and choose the ‘Match Fields’ dialog box in the ‘Write & Insert Fields’
- Now, you need to verify the details – match the names of column headings for records in the mailing list data source
- Do not do anything if the names match column headings in the mailing list data source (If it does not match, you need to select the drop-down arrow and choose the field name in the mailing list data source)
- Click ‘OK’
You Need to ‘Format Mail Merge Fields’
Choose the merge field name and make necessary changes to the font size and spacing of the merged content.
- Go to the ‘Preview Results’ group on the ‘Mailings’ tab and select ‘Preview Results’ to move to the mail merge fields from the merged results in your letter.
- Here, you have to select the merge field name
- Select the font and its size as per your desire (on the ‘Home’ tab)
- Choose the paragraph spacing on the ‘Page Layout’
Step – 5: Preview & Finish
Want to preview the merge results? You will be able to do it only after adding merge fields to the main document. Complete the merge process only after you are happy with the preview.
- Select ‘Preview Results’
- Choose ‘Next’ or ‘Previous’ record button to ensure the addresses and names are correct
- You need to select ‘Finish & merge > Send E-mail Messages’
- Select the name of the email address column from the list (in the ‘To’ box)
- In the ‘Subject line’ box, the email sender must type a ‘subject line’ for the message
- Choose ‘Plain Text or HTML (default setting)’ in the ‘Mail format’ to send the document as the body of the email message
- Under the ‘Send records’ section, you need to perform one of the following activities:
- Select ‘Current record’
- Or, you can accept the default setting to merge and send ‘All’ records
- Or, enter the ‘record number’ in the ‘From’ box and start the merge. And you need to enter the ‘record number’ in the ‘To’ box
- Click ‘OK’ to run email merge
Step – 6: Save Personalized Message
In most occasions, users prefer to save the personalized message as they consider use it for another mail merge. If you chose to save the message, you saved its connection to the data source.
So, when you open the main document, you will be prompted by ‘Word’ whether to keep the connection to the data source or not. The document will open displaying information merged with the first record if you select ‘Yes’.
If ‘No’, the connection will be broken and the main document for the email will just be a standard Word document.
Find this article useful? If you couldn’t execute the methods properly, we recommend you to contact the professionals. Outlook customer care support is available 24/ 7 to help you.
Leave a Reply