February 15, 2022 / Lily Collins
How to Add Or Change Signature In Outlook?
Microsoft Outlook is an excellent email client to manage all your email accounts and email-related tasks. It allows you to easily access your emails from your different email accounts and also allows you to create a signature for your outgoing emails messages. Also, you can add text, logo, images, electronic business card, and even your handwritten signature. To know how to add or change a signature in Outlook, go through the instructions provided below in this guide.
Guide to Add a Signature in Outlook
NOTE: If have a Microsoft Office 365 account, and you have Outlook and Outlook on the web or Outlook on the web for a business account, you will have to create a signature for both products individually.
1.) Start by opening a new email message in your Outlook email program and select the Signature option. In the Signature section, select the Signatures option under the Message menu.
NOTE: The location of the Message menu and Signature option may vary according to the size of the Outlook window and whether you are replying, or forwarding an email, or composing a fresh email.
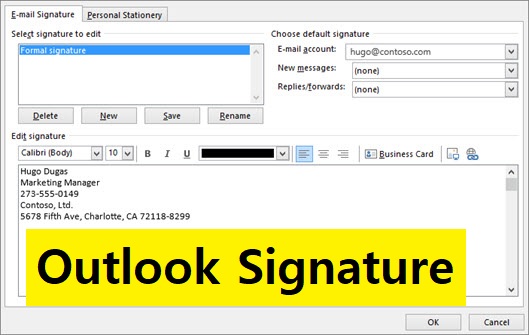
2.) Next, click on the New option located under Select signature to edit section and enter suitable a name for your signature in the New Signature dialog box.
3.) Then, you will need to go to the Edit signature section and create your new signature. In order to personalize your signature, you can change your signature’s font, font color, text size, alignment of the text and more.
NOTE:
- If you wish to add a signature with borders, tables, and bullets, it is suggested to first create it using the MS Word application and then you can copy and paste it into the Edit Signature box.
- To add images and links to your email signature or adjust fonts, and justify the text, you can make use of the formatting bar available in the Edit signature box.
- Well, if you also want to add social media icons and link to your email signature, you can do so by clicking on the “Add Picture” icon located next to the Business Card option. Just select the icon from your computer and add it into your Edit signature box.
- In order to add a hyperlink to your signature, select the Hyperlink icon located next to the Picture icon in the Edit Signature box, enter the web address in the provided field and click on the OK button.
4.) After making the desired changes for your new signature, you will need to go to the Choose default signature option and configure the following options for your signature.
- In the E-mail account drop-down box, you will need to select an email account to link with your signature. If you want you can add a separate signature for your each email account.
- To automatically add your signature to all new email, just go to the New messages drop-down box and select your desired signatures.
- To not to add your signature to new emails automatically, simply select the (none) option. This will prevent emails from automatically adding the signature to emails you forward or reply to.
- In case you wish to include your signature to the emails you reply or forward to, you will need to select one of your signatures from the Replies/Forwards drop-down and choose one of your signatures. On the other hand, you can even configure it as the default option – (none).
Once you are done following the above steps, you will need to click on the OK button to finish the process.
NOTE: You must make a note that Outlook won’t include your signature to the emails you opened in Step 1. Even if you would have selected the option to apply the signature to all your new emails, you will either need to add the signature manually or discard this message. To know how to add a Signature manually in Outlook follow the instructions provided below.
Steps to Add a Signature Manually in Outlook 2016
In case you didn’t opt to for the option add a signature for all new emails or replies and forward them automatically, you can easily add the signature manually by following these instructions.
1.) Go to the email message and select the Signature option located under the Message tab. This will open a list of signatures created by you in Outlook.
2.) Next, you will need to select the signature that you want to include in your email. That’s it you are done.
3.) Then, you will be able to send the email message to a recipient with the signature you added in the previous step.
So, these are the instructions that you will need to follow to create a personalized signature in Outlook.
Leave a Reply