February 15, 2022 / Lily Collins
How to Send Fax From Email Outlook
Microsoft Outlook needs no introduction. Millions of people across the world make the most out of its outstanding features – to send and receive messages, attachments, files, documents, store names and numbers of contacts, manager calendar, and more. In short, Outlook is a must-possess asset for everyone – be it in the corporate world or in the personal space. No matter how well-versed you are with Outlook, you haven’t surely mastered this great platform.
Some of the greatest features of Outlook are –
- Scheduling emails
- Creating meetings, appointments, contacts, and tasks from one window
- Sending similar emails quickly with Quick Parts
- Keyboard shortcuts
- Sharing calendars
- View messages your way
- Effective task management
- Creating and managing rules
- Searching
- Opening multiple Outlook Windows
Did we mention faxing documents through email using Outlook? This is a great feature that Outlook bestows upon the users to make the most out of it. Facing through email has a wide range of benefits such as printing and repair costs associated with fax machines, faxes at one time and saving on supply, and the ability to send multiple pages.
How to Fax From Email Outlook?
If you think emailing to a fax number using Outlook is difficult, you need to think twice.All you will need is only a fax service subscription. However, you might make some changes to your Outlook setup that too depending on your version of Outlook or your fax service.
Below, we bring you 6 steps to learn how to fax from email Outlook.
Step 1:If you don’t have a subscription, you should subscribe to the fax service, and complete the setup by following the instructions mentioned.
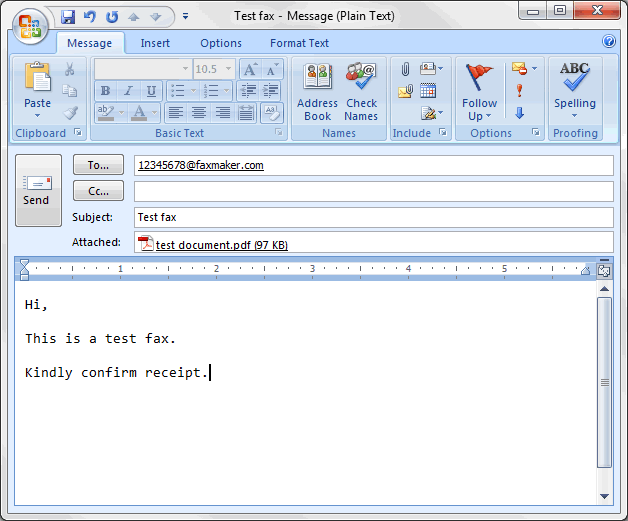
Step 2:The next step involves opening a blank email message window.
Step 3:In this stage, you will need to enter the fax number of the recipient. Enter the fax number email address if you want in the “To” field. Here are a few ways that you can stick to enter the fax number.
- Email Address with Fax Number: Enter the username followed by the “At the Rate of” symbol and the domain name of the fax service provider.
- Only Fax Number: 10-digit fax number, 10-digit number with calling card digits, an 8-digit number without area code, or an international number
- The text “Fax”, which is further followed by the fax number.
You can enter the fax number these ways.
Step 4:While composing it, you should consider adding a “Subject” to it. It tells the purpose of the fax. This is similar to composing an email.
Step 5:The fax documentation and your cover sheet should be attached to the email (only if your fax service provider allows it).
Step 6:The last step is easy. You need to click on the “Send” button. That’s it!
The steps above are simple and straightforward. Anyone with a little technical knowledge and email can carry out the above instructions.
Send Fax from Outlook 2016
Learn the following steps on how to send a fax from Outlook 2016.
- Launch your web browser and go to FAX.PLUS.
- Here, register for a free account.
- After that, go to your profile. You need to ensure that the Email to Fax feature should be enabled (by default).
- On your Mac or Windows PC, open the Outlook software.
- Click on the “New Email” button and insert the fax number in the “To” field.
- You need to use the “Body” as a fax cover sheet.
- Now, attach the documents to be faxed.
Leave a Reply